Using the Xserve RAID in the Modern Day
Table of Contents:
- Background
- Getting Started
- Configuring the Xserve RAID
- Connecting to the Xserve RAID
- Using the Xserve RAID as a NAS
- Things to consider
- Wrapping things up
Background
The Xserve RAID is an enterprise 3U mass-storage server commonly paired with Apple Xserves and Mac Pros. It originally debuted in 2003 and was later revised in 2004 before being killed in 2008. The Xserve RAID is a Just a Bunch of Disks (JBOD) chassis that holds up to 14 hot-swapable drives. These 14 drives are split into two independent groups of 7 drives, each managed by an identical RAID controller. These controllers are not redundant, however. In the event one would fail, 7 drives would be inaccessible.
Each of the Xserve RAID's RAID controllers contains one 10/100BASE-T Ethernet RJ-45 port, as a management port, a Fibre Channel port for data transfer, and a DB-9 serial port for UPS systems. Depending on the revision, the Fibre Channel port would either be a HSSDC2 or Small Form-factor Pluggable (SFP) connector. With the SFP connector coming on the later models made in 2004-2008.
This blog post won't be an exact guide, like the other blog post I made about how to configure the Xserve's Lights-Out Management (LOM) port, which you can find here, but rather it will be a general guide on how to configure and use the Xserve RAID. This guide is also tailored more towards the later models of Xserve RAID with SFP, as that is the model I have.
What is RAID?
Before we get too deep into this, we should probably briefly address what RAID is. RAID, or Redundant Array of Independent Disks or Redundant Array of Inexpensive Disks, depending on who you ask, is a way to take multiple storage disks, such as hard drives or solid-state drives (SSDs), and combine them together to appear as one disk. This can be done via hardware through a dedicated RAID controller, like the Xserve RAID has, or in software. Both implementations have their advantages and disadvantages; however, software RAID, through file systems like ZFS, seems to be becoming the main way RAID is implemented, especially in the homelab space.
The main benefit of hardware RAID is that it offloads the work from your system to a dedicated card. Just like a Graphics Processing Unit (GPU) is used to handle the graphics of your system, offloading that work from the Central Processing Unit (CPU), the RAID controller does the same thing for RAID. Another advantage of a dedicated RAID controller is that, assuming it has a battery, it prevents data loss in the event you are in the middle of writing data to the array and lose power. The major downside of using hardware RAID is that if the RAID controller dies, unless you replace it with a similar controller, you could lose your data.
The major benefit of software RAID is that it is platform-agnostic. For example, if you create a RAID array in ZFS, you can move that array across systems, and the array and its data will remain intact. One of the bigger downsides of software RAID is that it is more taxing on the CPU. However, with how much CPUs have improved over the decades since RAID was first introduced, this is not as big of an issue. Another downside is the lack of protection against power loss. Unlike a RAID controller with a battery, if your system loses power during a write, you are susceptible to data corruption.
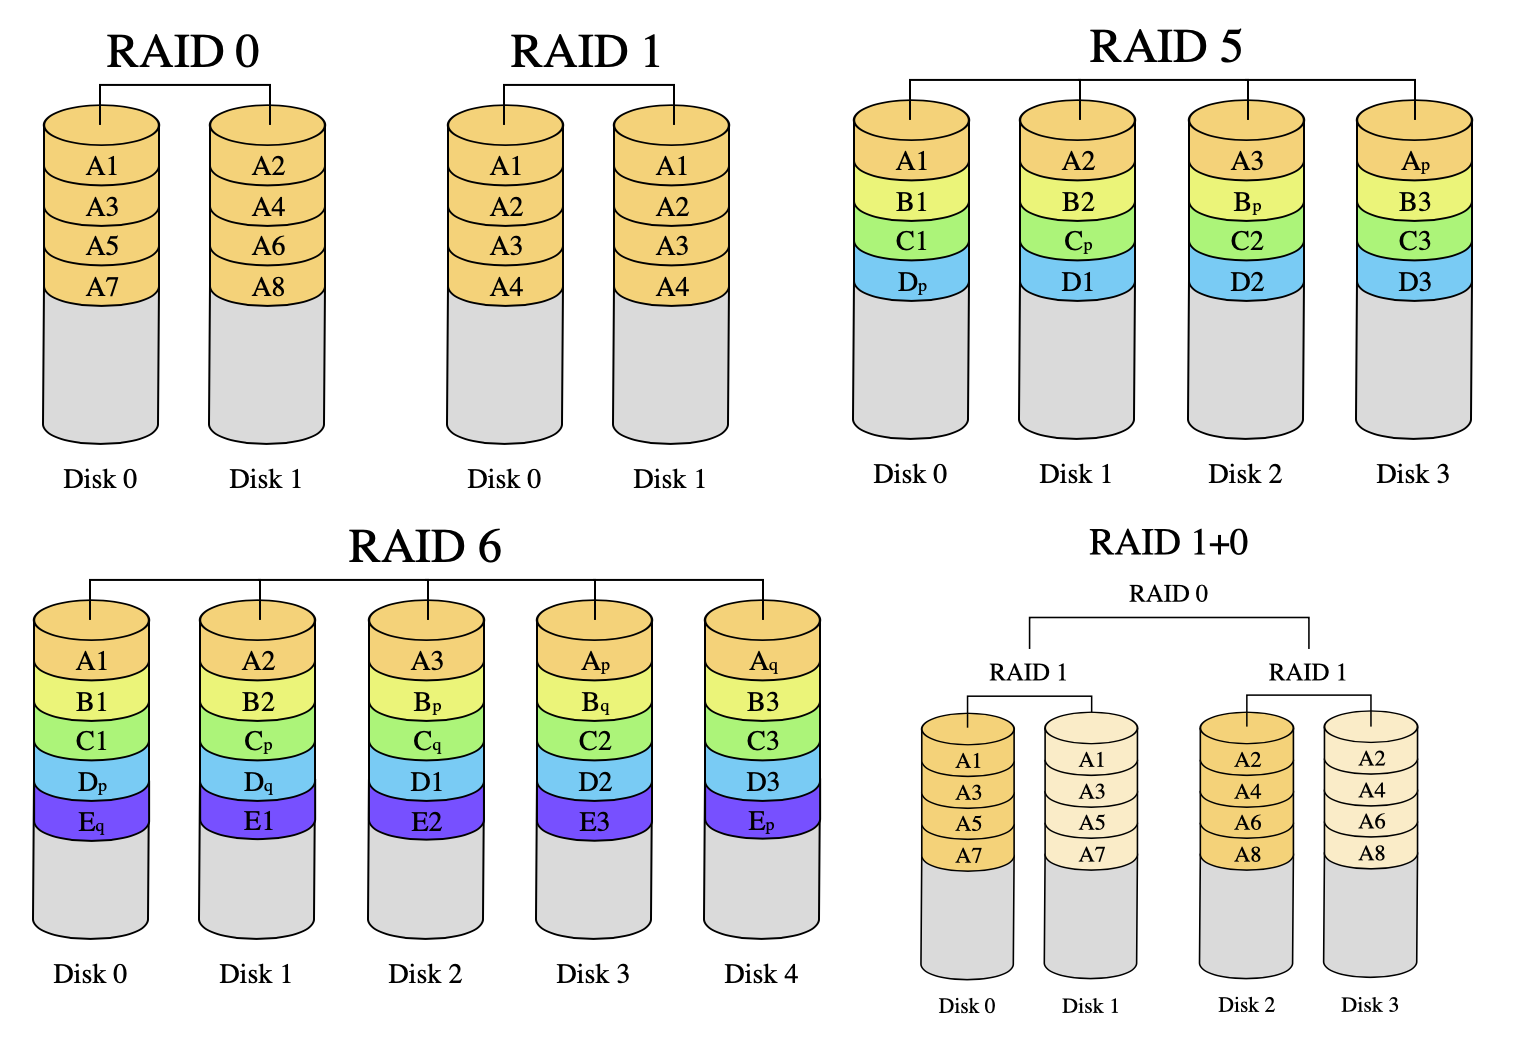
Figure 1. Versions of RAID visualized
When it comes to RAID, there are various levels. We will not discuss all of them, but some of the more common levels are 0, 1, 5, 6, and 10, as seen above. RAID 0 uses a methodology of striping the data. This means each block of data is written to a different disk. This has a couple of key advantages. First, the write performance is greatly improved due to the data you are trying to write being able to be split up and written in parallel across all the drives. Meaning your effective read and write speeds are equal to that of the combined read and write speeds of all the drives; so, if you have an array of six SSDs with read speeds of 500MB/s and write speeds of 200MB/s, your effective read and write speeds of your array are 3,000MB/s and 1,200MB/s respectively. Similarly, this level of RAID gives you the maximum storage size out of your drives. If you have five drives of 6TB each, then your array has 30TB of usable space. However, it has a major drawback: if one disk dies, all of your data is gone. RAID 1 is the opposite. RAID 1 is a mirror, which means a copy of the data gets written to each drive in the array. This is great for redundancy since it allows you to lose a disk and not worry about losing any data.
RAID 5 and 6 are basically the same, with one key difference. RAID 5 and 6 add parity bits when writing the data, so in the event of a drive failure, the lost data can be recovered. The main difference is that RAID 5 can sustain a single drive failure without losing any data, while RAID 6 can sustain two drive failures. The downside to RAID 5 and 6 is that, due to the parity calculations, you don't achieve any speedup in your write performance. However, you do achieve an improvement to your read performance equal to the collective read speed of all of your drives minus one, in the case of RAID 5, or minus two, in the case of RAID 6. This means, if you had a RAID 5 array of three hard drives, each with a read performance of 120MB/s, you could expect a maximum read performance of 240MB/s from your array.
RAID 10, or RAID 1+0, combines the striping performance of RAID 0 with the redundancy of RAID 1. What RAID 10 does is, it mirrors the data like RAID 1, but stripes the data across those mirrors. This way, even if you lose one of the drives, all of your data is still intact due to the striped data being mirrored. Unlike RAID 5 and 6, which give redundancy but no write speed improvement, RAID 10 gives you redundancy while also improving your write performance. However, it comes at the cost of you only being able to use half of your storage due to the mirroring of the data. As such, your maximum write speed is equal to half of the combined write speed, but your read speed is still equal to that of the combined read speed of all your drives. If we take the same scenario from our RAID 0 example but instead use RAID 10, the effective read speed would remain 3,000MB/s, but the write speed would now be 600MB/s.
Getting started
In order to use the Xserve RAID, you obviously need an Xserve RAID and its corresponding Fibre Channel cables. In addition to this, you will also need a PCI-E Fibre Channel card for the device you wish to connect to the Xserve RAID. If you happen to have a Fibre Channel switch, you could plug the Xserve RAID directly into that; however, you would still need Fibre Channel cards for each of the machines you wanted to connect to the Xserve RAID. As we'll discuss later, though, you can use the Xserve RAID as a Network-Attached Storage (NAS) which more or less negates this use case, albeit not entirely. The main benefit of using the Xserve RAID as a NAS is that you only need one Fiber Channel card, and then all of your other devices can access the Xserve RAID over the network.
You will also need the Xserve RAID management software, RAID Admin, which can be found on Apple's website. According to Apple, in order to run RAID Admin, you need to be running Mac OS X 10.2.8 or later. However, RAID Admin is a Java application, so theoretically, it would also work on Windows and GNU/Linux systems. However, newer versions of Java don't play nicely at all with RAID Admin. This is in part due to the security standards used in older versions of Java. I did manage to get RAID Admin to run on macOS Ventura with the latest version of Java, but RAID Admin crashed when I tried doing anything. Mac OS X Lion 10.7.5, on the other hand, worked without issue. Keep that in mind when trying to configure the Xserve RAID.
If you have an old Mac running Mac OS X Lion 10.7.5, you could use that. Which, if you followed my tutorial on
how to configure the Xserve's LOM port, you would already have one
However, shamless plug, I would recommend using the custom Docker container I made, which you can find
here. The reason I recommend this is for security reasons. You can easily spin up and shut down
this container as needed, and you don't have to worry about having an old version of Java lying around on your system or using an outdated and unsupported operating system.
The Docker container is a simple Debian container that is accessible via VNC and is pre-packaged with a supported version of Java and RAID Admin, along with the firmware update that comes with it.
This way, whenever you need to use it, you can just type docker-compose up -d, do whatever you need to do, and then docker-compose down
to shut it down.
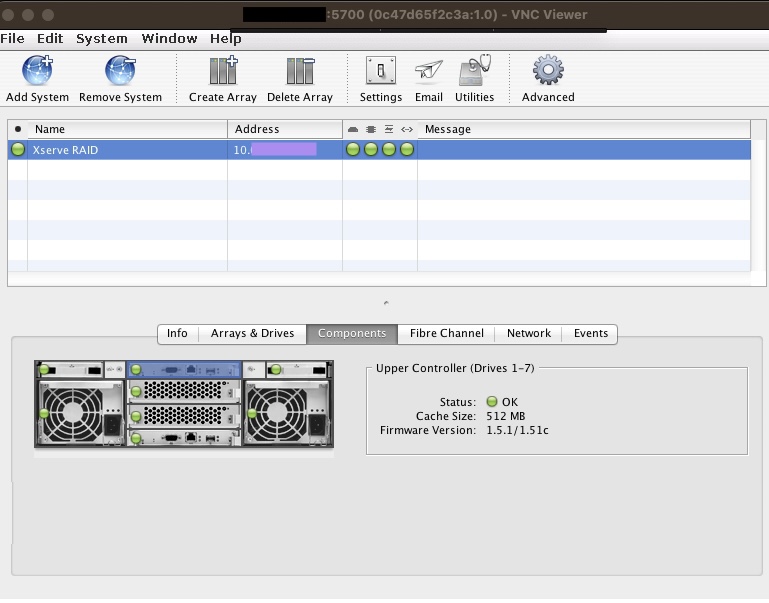
Figure 2. Running RAID Admin in a docker container and connecting via VNC
Regardless, once the Xserve RAID is configured, you really don't need RAID Admin unless you want to change the RAID configuration, password(s), or IP address(es).
Configuring the Xserve RAID
If you aren't using the docker container, the first step in configuring the Xserve RAID is to download and extract RAID Admin
if you haven't already. On older versions of Mac OS X, you should just be able to double-click the .jar file and be good to go,
as it will install the requisite Java version for you, if needed, and open with no issues.
Before you can configure your Xserve RAID, you need to make sure it is accessible. If you have never used your Xserve RAID or you forgot its passwords or IP addresses, it's best to reset it first. To do this, ensure the machine is plugged in and powered on, and its management ports are plugged in. Also, make sure its volumes are not mounted on any other device. Then, press the reset button through the pinhole on the back of the controller module for five seconds, then release the button. Do this for both controllers. The controller will restart, and you will see the power LED and the four status LEDs on the front panel turn on while restarting. Do not hold the button down during the restart. (If the button is held down during restart, it will be necessary to restart the RAID again.)
Once you reset the controllers, the IP addresses of them will be set via DHCP, the name of the machine will be Xserve RAID, the monitoring password is changed to
public, and the management password is changed to private.
With your Xserve RAID reset, click the Add System button in RAID Admin. Assuming your machine running RAID Admin and the Xserve RAID are on the same network,
the Xserve RAID should be automatically detected by RAID Admin, as seen in Figure 3. Then, select the Xserve RAID and enter your monitoring password, which, if you reset your Xserve RAID, will be public.
If the Xserve RAID isn't automatically detected, you can manually enter its IP address and monitoring password and connect to it that way.
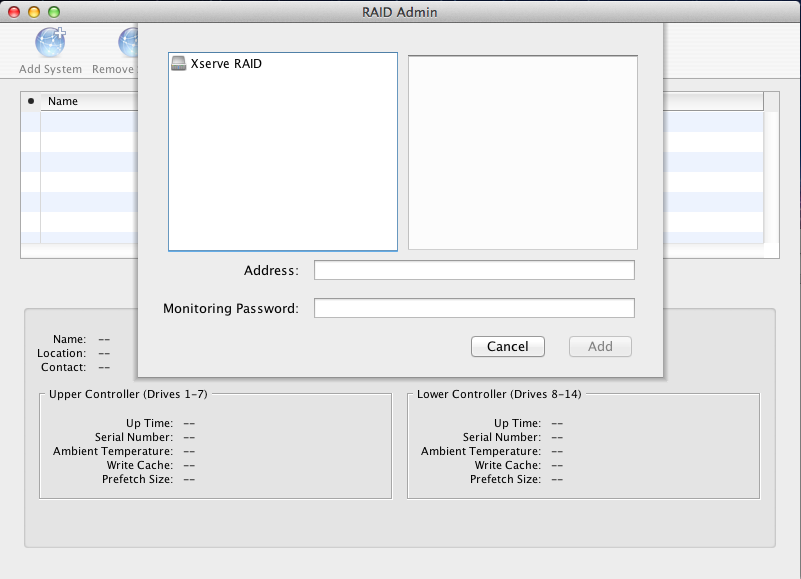
Figure 3. Xserve RAID being automatically detected
Take note of the firmware versions that your Xserve RAID's controllers are on. To find this, select your Xserve RAID in RAID Admin, click on Components, and
then click on each RAID controller to view its firmware version, as seen in Figure 3. If the firmware version is not 1.5.1, you will be able to update it with the included firmware update,
firmware-1.5.1-1.51.xfb, that is bundled in the .zip or .tar.gz file you downloaded with the RAID Admin tool.
Similarly, instructions on how to install the firmware update are included in the READ ME FIRST.txt file found in the READ ME FIRST folder.
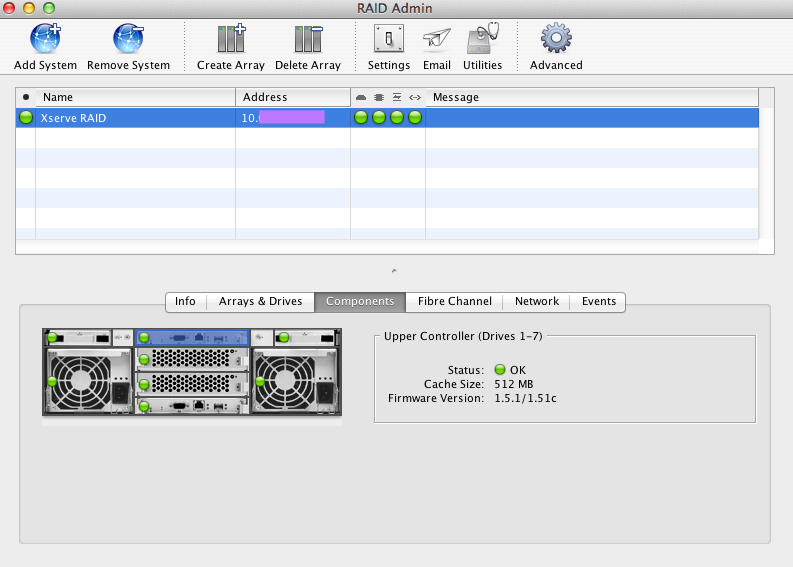
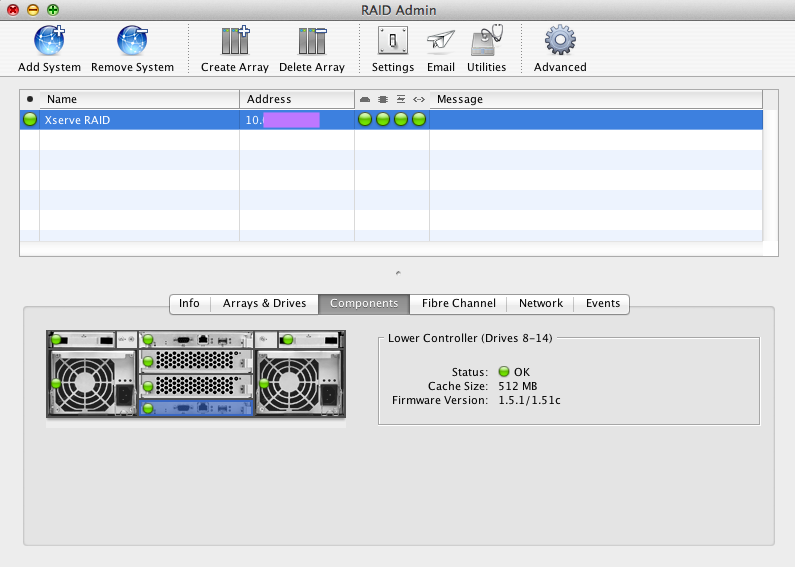
Figure 4. RAID controller's firmware version
With the Xserve RAID connected and its firmware up to date, we can begin configuring it. With the Xserve RAID selected in RAID Admin, click the Settings button
in the top menu bar and enter the management password. The default is private. In the settings menu, you are able to configure the system (Figure 5),
network (Figure 6), Fibre Channel (Figure 7), and performance settings (Figure 8).
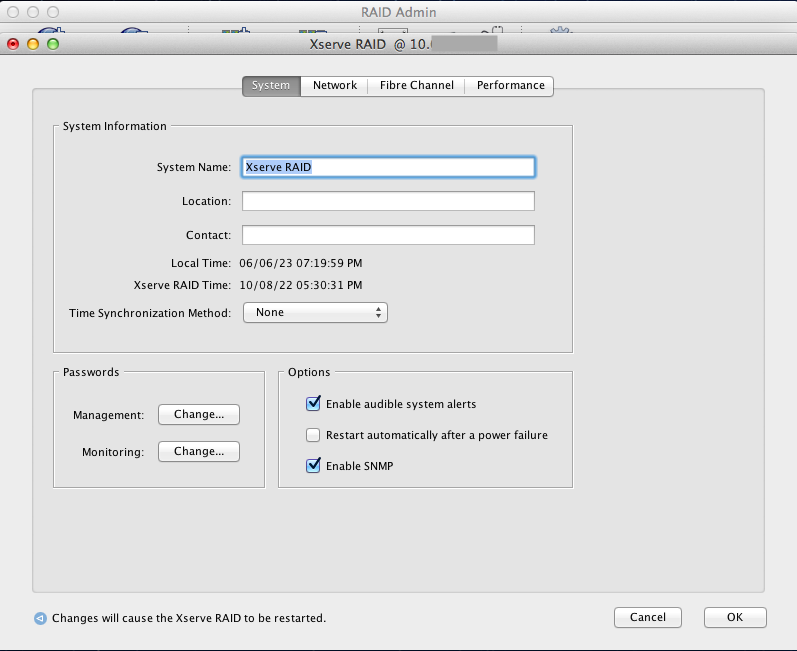
Figure 5. Xserve RAID System settings configuration menu
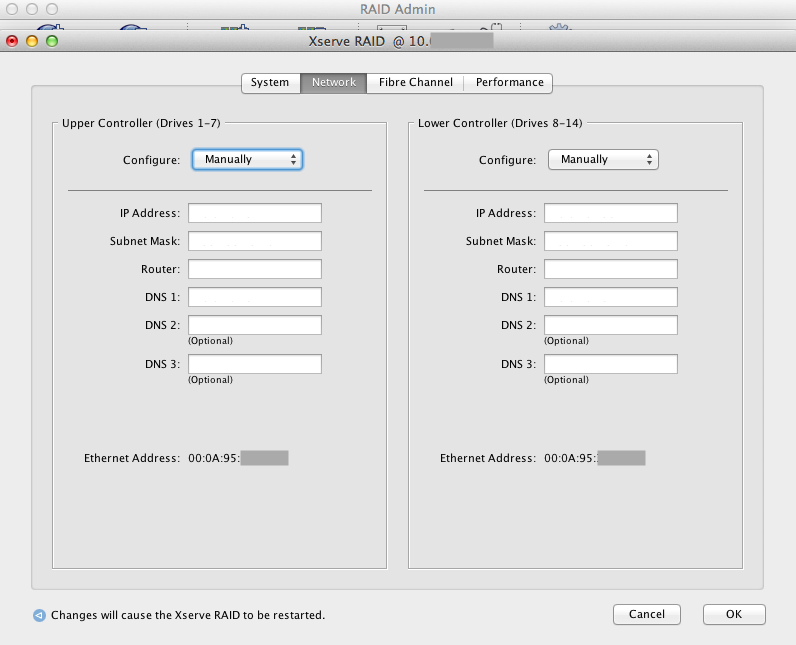
Figure 6. Xserve RAID Network settings configuration menu
For the network settings, I configure mine manually just so I know the IP of my Xserve RAID will not change, although you can use DHCP too.
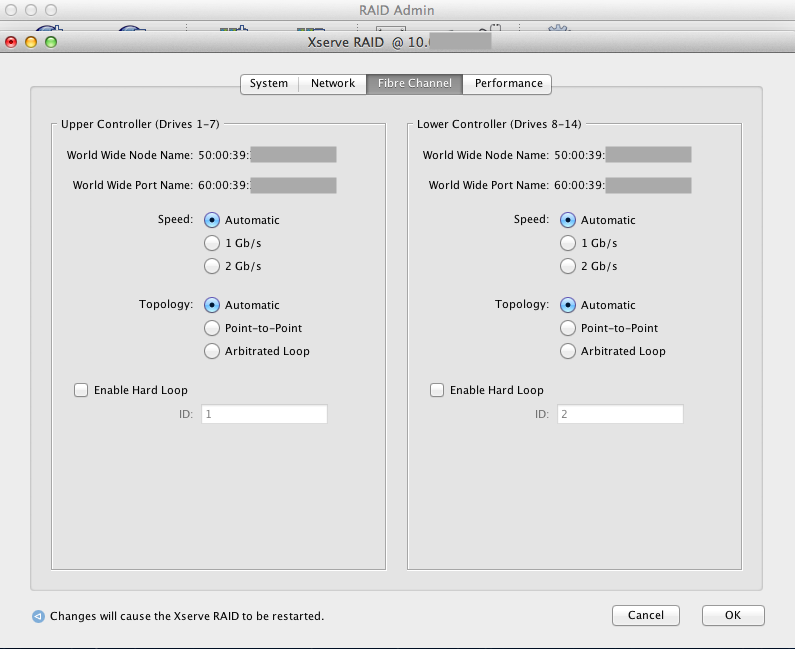
Figure 7. Xserve RAID Fibre Channel settings configuration menu
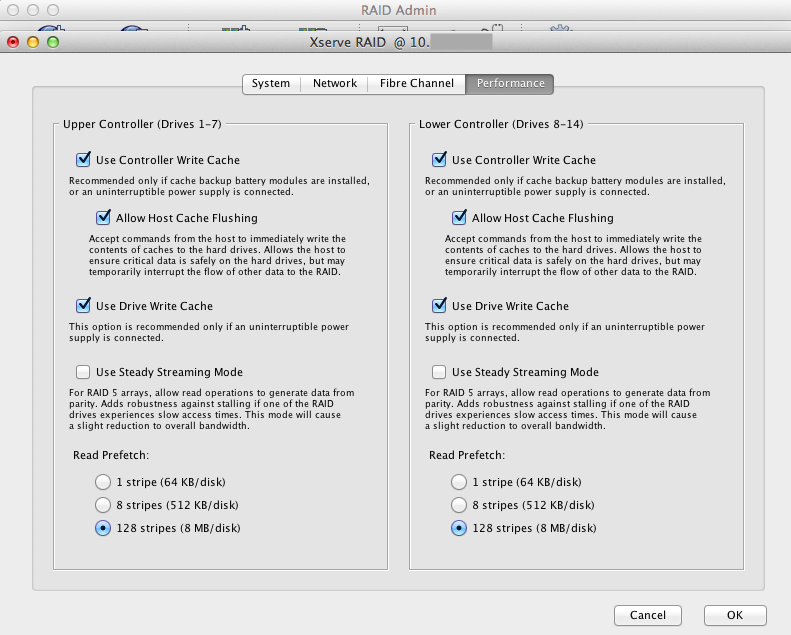
Figure 8. Xserve RAID Performance settings configuration menu
Using the Create Array and Delete Array buttons, you can manage your RAID arrays on each of the controllers. The Xserve RAID controllers are capable of the following RAID levels:
0, 0+1, 1, 3, and 5.
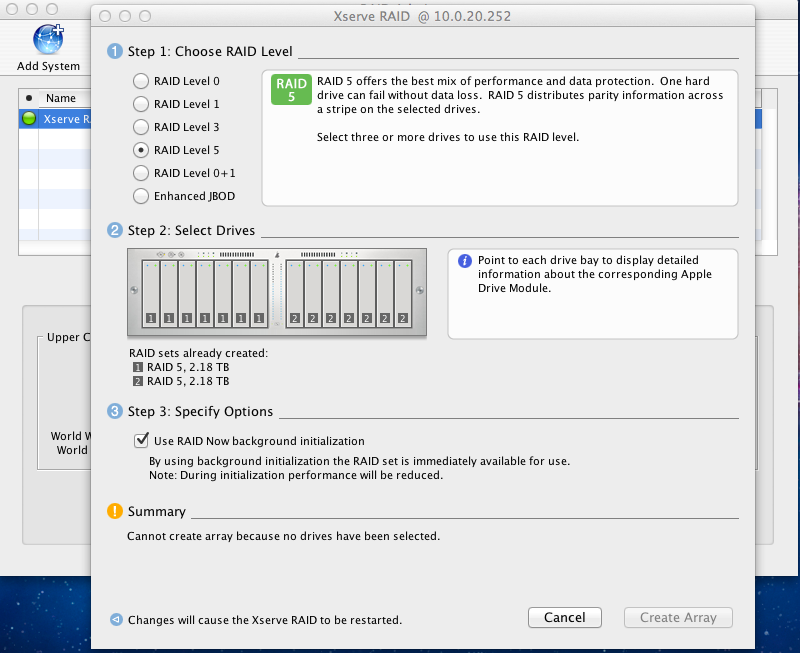
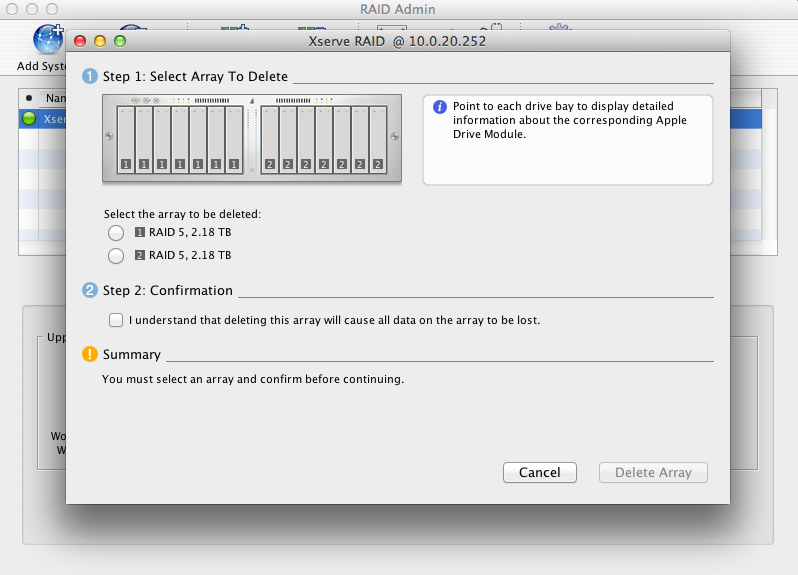
Figure 9. Settings to create a new RAID array (left) and delete an existing RAID array (right)
Connecting to the Xserve RAID
Now that you have configured your Xserve RAID and its storage, it is time to connect to it. To do this, take your Fibre Channel cables and plug one into each of your RAID controllers, if you haven't already done so. Next, plug the other end of each cable into your Fibre Channel PCI-E card or Fibre Channel switch. If you are plugging into a Fibre Channel switch, make sure the device(s) you wish to connect to the Xserve RAID are also connected to the Fibre Channel switch. Once you plug the Fibre Channel cable into your PCI-E card, the Xserve RAID should automatically mount itself, as seen in the image below. If you don't see the Xserve RAID appear on the desktop, check the left sidebar in your Finder window.
Figure 10. Xserve RAID mounted on the desktop
With the Xserve RAID mounted, you can now format the Xserve RAID volume(s) (if needed) and use it like you would any other external hard drive, USB drive, NAS, etc.
Using the Xserve RAID as a NAS
With the Xserve RAID connected, we can take this a step further and turn it into a NAS. In order to do this, we need to make sure the machine the Xserve RAID
is connected to over Fibre Channel has file sharing enabled and has the Xserve RAID selected as one of the volumes or folders to share. To configure that on macOS,
navigate to System Settings, go to your Sharing preferences, and ensure File Sharing is enabled. Next, ensure the Xserve RAID
is selected as one of the folders to be shared, as seen below.
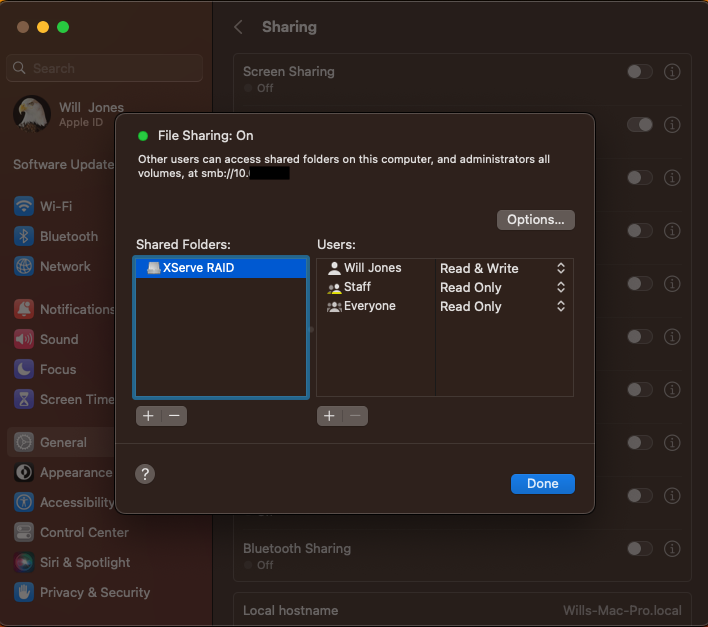
Figure 11. Configuring file sharing settings
With the machine connected to the Xserve RAID now sharing the Xserve RAID on the network, you can now connect to it. There are multiple ways to do this.
On macOS, in Finder, if you go to the network tab, you should see the Xserve RAID volume there. Otherwise, with Finder open,
hit ⌘+K and type the command below, replacing the IP address with the IP address of the machine you have connected to
the Xserve RAID.
smb://192.168.34.163
On Windows and GNU/Linux systems, the process is the same. The Xserve RAID volume should show up automatically as a possible network device to connect to, but if not, you can manually add it as an SMB share.
As seen in Figure 12, I have successfully mounted the Xserve RAID as a network drive, just like I would my personal NAS.
Figure 12. Xserve RAID mounted over the network as a NAS
With the Xserve RAID mounted as a network drive, I can now write data to it just like I would write data to my NAS, as seen in Figure 12.
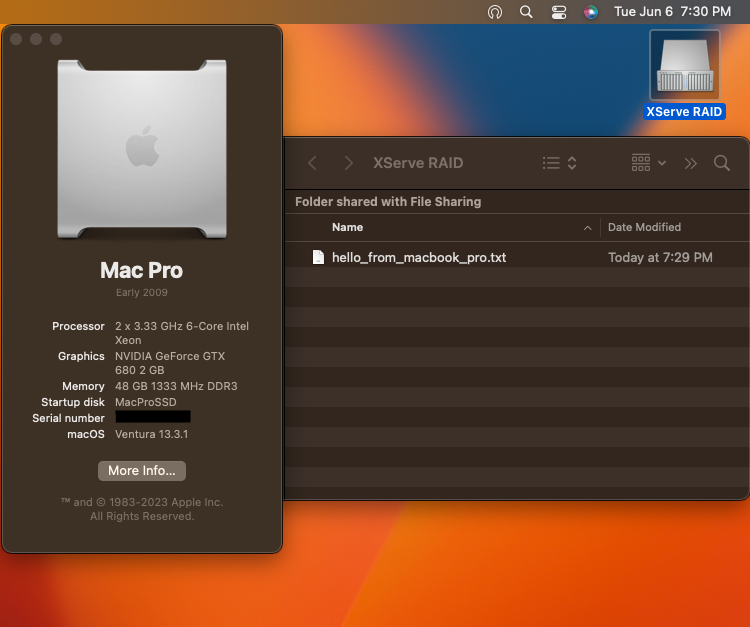
Figure 13. Writing files to the Xserve RAID from other devices on the network
One thing to note, though, is that as cool as it is to have the Xserve RAID set up as a NAS, you are almost guaranteed to run into bottlenecks due to networking. The Xserve RAID is capable of speeds up to 2Gb/s, per RAID controller. Meaning, if your Mac or other device connected directly to the Xserve RAID is only connected to the rest of the network via a 1Gb/s connection, you will be bottlenecked and won't be able to harness the full speed of the Xserve RAID. Similarly, it goes without saying that if the rest of your devices you wish to connect to the Xserve RAID are also connected to the network via a 1Gb/s connection, they will be bottlenecked as well.
Things to consider
As cool as the Xserve RAID is, it does have its drawbacks. The Xserve RAID is an early 2000s piece of enterprise hardware, and it has the noise and power draw to prove it. While not quite the screaming banshee of the Xserve, it is still loud. However, unlike the Xserve, which will ramp its fans up and down, the Xserve RAID's fans run at the same speed very consistently. Continuing on the topic of fan noise, the Xserve RAID is silent when plugged in and not turned on. This is in contrast to the Xserve, whose power supply fans will kick on as soon as they have power and generate a very noticeable amount of fan noise; however, it's not as bad as when it is fully powered on.
As far as power draw is concerned, my system, fully loaded with 14 drives, draws ~510 Watts (W) at idle. It also drew 42W when just plugged in but not turned on. On first boot up and under load, having data written to it, it drew upwards of 600W. I do want to point something out when it comes to these high power draw numbers, specifically the plugged in but not turned on number. My system is equipped with two RAID battery modules to keep the RAID controllers powered in the event of a power loss. These batteries were not fully charged when I did my power draw tests, so there is a chance a large portion of those 42W was due to the batteries charging. Similarly, a portion of that 510W idle could also be attributed to charging the batteries, but you obviously can't write off all that power draw to charging the batteries.
If either noise or power draw is a concern for you, the Xserve RAID is definitely not something you want to use as your primary means of bulk storage. Personally, I keep mine unplugged unless I want to use it.
Another drawback of the Xserve RAID is its drive capacity. The Xserve RAID does not take standard SATA or SAS hard drives. Rather, it takes ATA/IDE drives, which have a maximum capacity of 750GB. This means you're limited to a maximum storage capacity of 10.5TB of raw storage. That, of course, is before you do any kind of RAID configuration. Unless you're a serious data hoarder that shouldn't be an issue. However, going back to power draw, the more hard drives you have, the higher your power draw will be. Nowadays, there are much more efficient ways of getting 10.5TB of raw storage.
Wrapping things up
Regardless of how you use the Xserve RAID, as a NAS or directly connected via Fibre Channel, arguably the most satisfying thing is writing data to it and watching it light up like a Christmas tree with all the blinking lights.
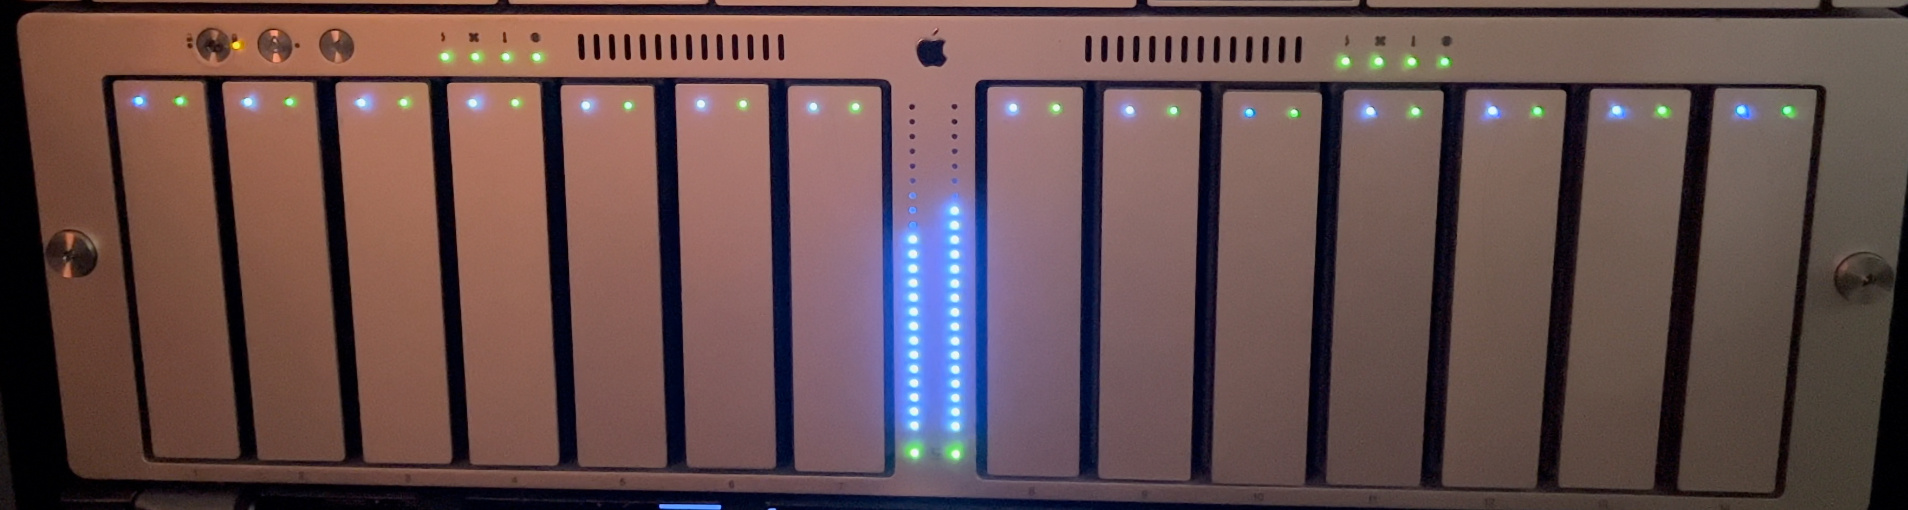
Figure 14. Xserve RAID lighting up like a Christmas tree
Another thing that cannot be denied is how beautiful the Xserve RAID looks, especially with all its drive sleds and mounted in a rack where it belongs. These days, you can get more storage and faster transfer speeds, all while running cooler, quieter, and drawing a fraction of the power for less money. Since Xserve RAIDs are not cheap, power-efficient, quiet, or even practical nowadays; but, what they are is a gorgeous piece of enterprise gear that will look stunning in any server rack, even if they're powered off.